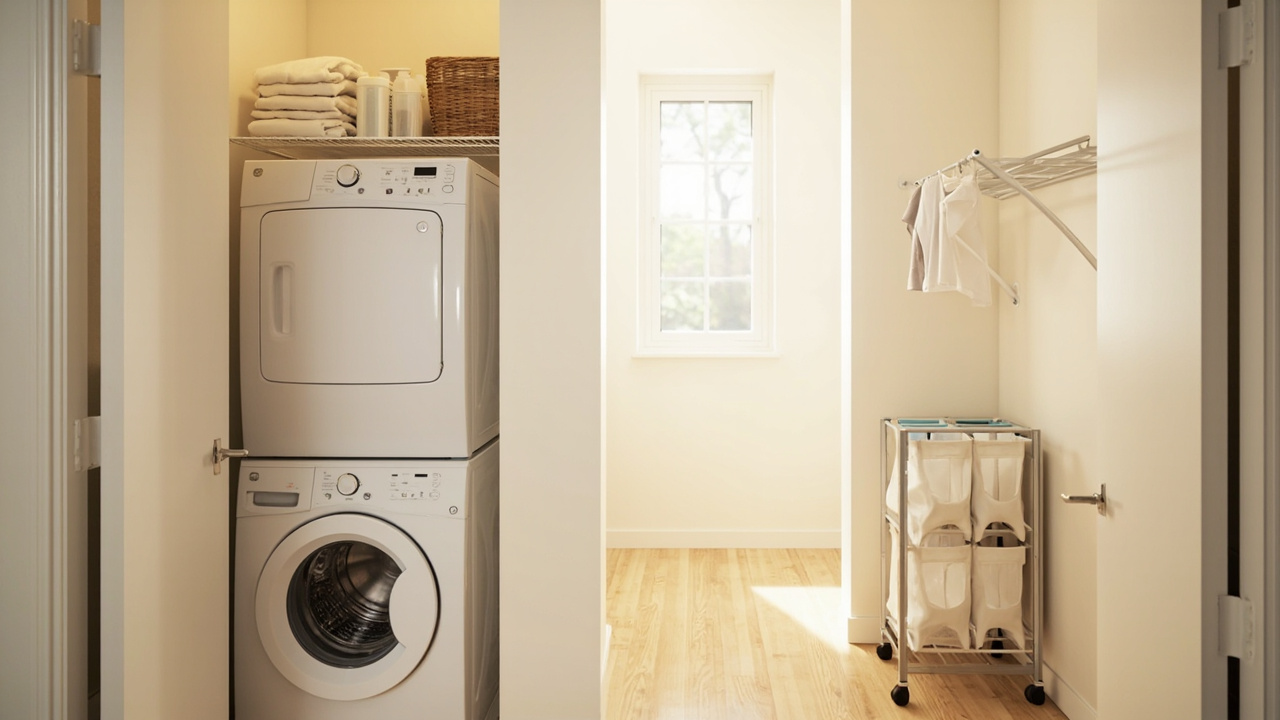
A laundry room layout is the floor plan that decides where the washer, dryer, sorter, drying rack, and folding surface live. Get it wrong and the room turns into a daily obstacle course; get it right and the same square footage runs on auto-pilot. For the broader organization workflow, see 5-stage laundry room organization, or jump to the laundry guides hub for sibling layout, sorter, and folding-station guides. We’ve tested every archetype below across 4 different room sizes.
Quick Answer
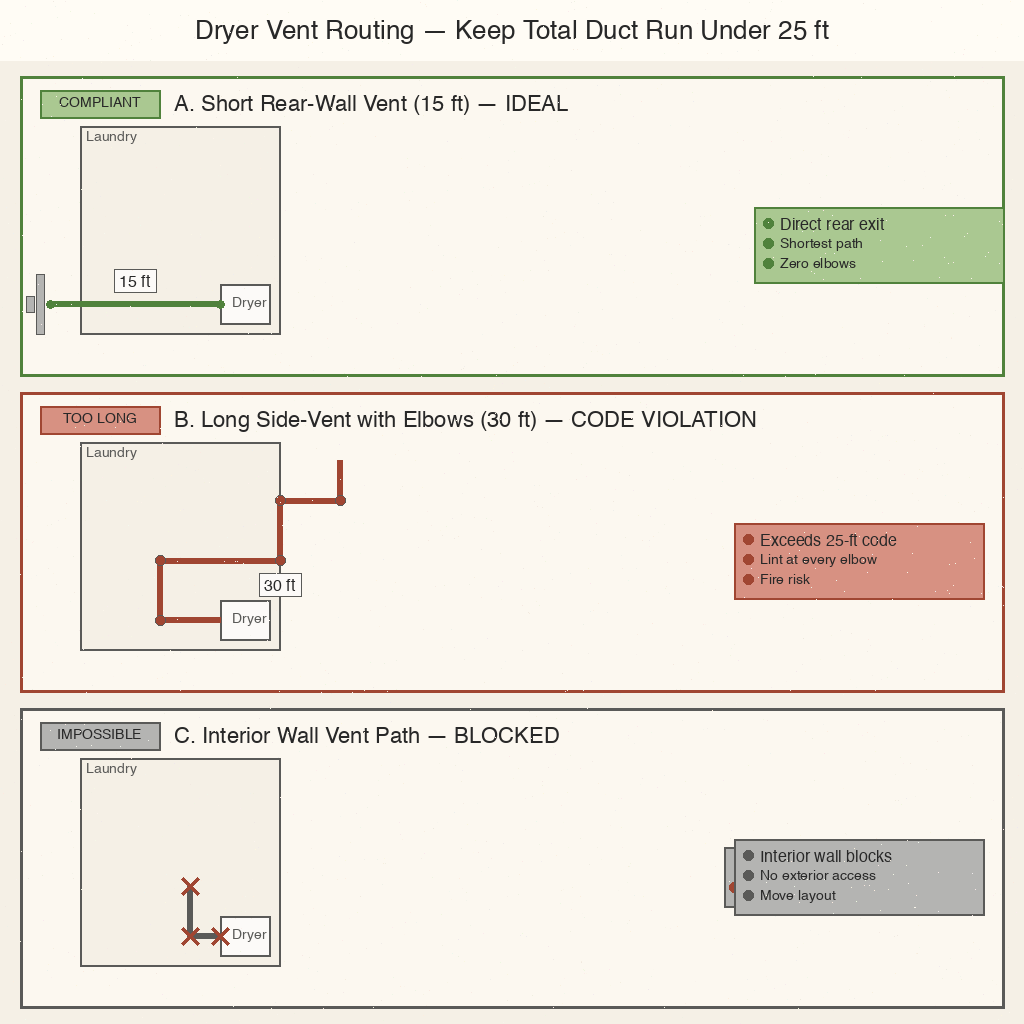
Plan around door swing, vent path, and one folding surface within three steps of the dryer. Measure the machine footprint first. Choose stacked (≥78-inch ceiling) or side-by-side (≥54-inch wall) by room geometry, with a 32-inch doorway minimum. Sorter at the entry, detergent in a closed cabinet above the machines, vent total under 25 feet — that’s the rule the fire code is built around.
Why Most Laundry Rooms Fail Without a Floor Plan
A laundry room is small (35-80 sq ft) and every piece of equipment wants a different priority — washer wants floor plumbing, dryer wants a short vent run, sorter wants floor space near the entry, drying rack wants wall length, detergent wants dry storage. Without a layout, these five demands collide. The 2026 shift is single-wall vertical layouts: stack the washer and dryer on a Funmit KSTK1 stacking kit ($28.97) with a 3-tier shelf above the pair and a sorter at the entry — fits a full wash-and-fold station into 27 sq ft.
The Four Laundry Room Layout Archetypes
Four archetypes cover every floor plan from a hallway alcove to a 100 sq ft room. Each maps a different geometry — narrow-vertical, wide-horizontal, door-closed closet, recessed nook.
1. Stacked Vertical Layout
The washer sits under the dryer on a stacking kit, reclaiming roughly 30 inches of floor width. Best for closets and narrow rooms where ceiling clearance exceeds 78 inches and the doorway is ≥32 inches wide. The Funmit KSTK1 stacking kit ($28.97) fits most 27-inch front-load pairs.
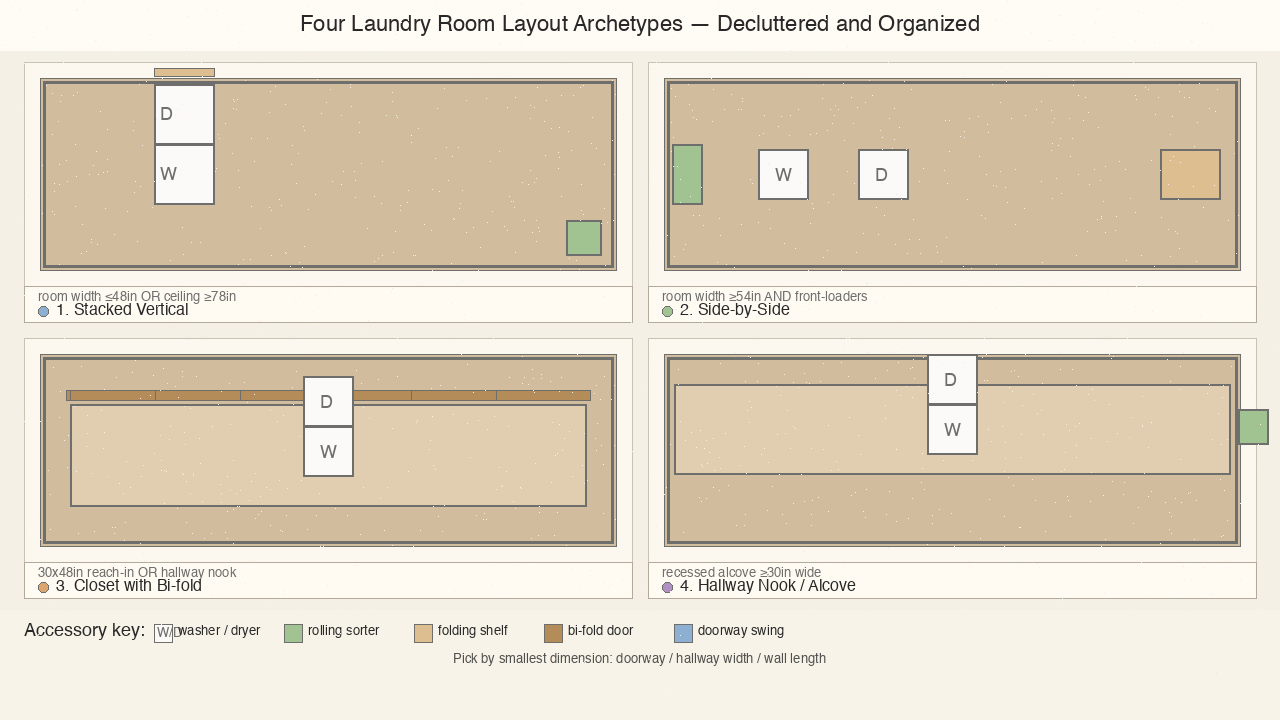
Use when: room width ≤48 inches OR ceiling height ≥78 inches.
Skip when: ceiling height <75 inches, doorway <30 inches.
2. Side-by-Side Layout
The washer and dryer sit parallel on the same wall, usually 27-inch-wide front-loaders with 1-2 inches of side clearance. Best for wider rooms (≥54 inches of wall length). The ClosetMaid Cubeicals 6-cube ($65.99) sits at counter height and doubles as a folding surface.
Use when: room width ≥54 inches AND household uses front-loaders.
Skip when: room width <50 inches OR a 24-inch compact washer is in use.
3. Closet Layout (with Bi-fold Door)
The laundry fits inside a reach-in closet (30-36 inches deep, 48-60 inches wide) behind a bi-fold door that swings flat. Best for hallway nooks and converted bedroom closets. The Kimberly Bay 6-panel bi-fold door ($126.88) hides the entire station when closed.
Use when: laundry is in a hallway, alcove, or multi-use room.
Skip when: the closet has no vent path outside.
4. Hallway Nook / Alcove Layout
A 24- to 36-inch-deep recess in a hallway or under-stair space holds a stacked or compact pair. Best for homes without a dedicated laundry room. Pair the Funmit KSTK1 stacking kit ($28.97) with Dadop pads ($9.98).
Use when: no dedicated room exists AND ceiling height is 78+ inches AND hallway width is ≥30 inches.
Skip when: the nook is on an interior wall with no vent path.
The Seven Zones Every Functional Laundry Room Needs
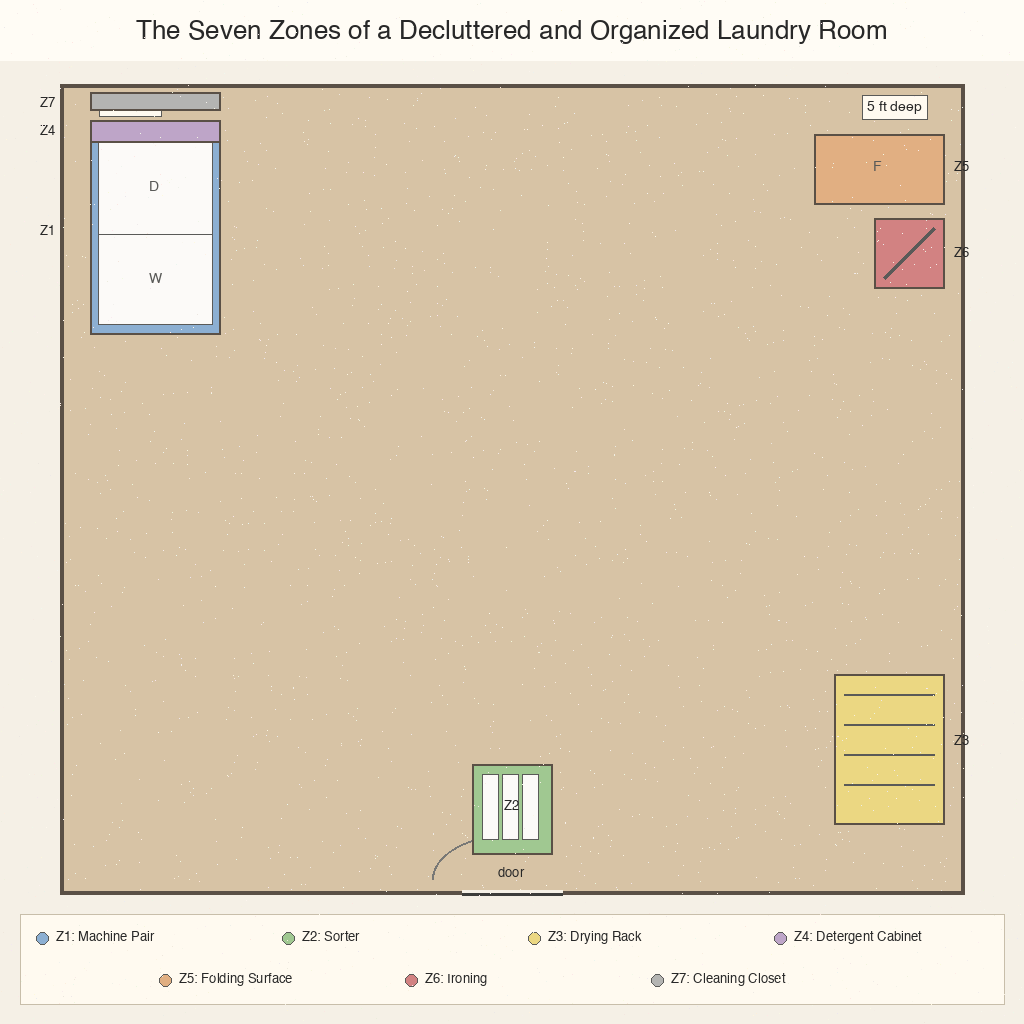
Once the archetype is picked, lay out the room by zone. Each zone has a fixed role and footprint.
Zone 1: Machine Pair (washer + dryer)
The 54-inch-wide by 30-inch-deep footprint is the layout anchor. Measure first, then design around it. Side clearance 1-2 inches each side; rear clearance 4 inches. The ClosetMaid SuperSlide shelf kit ($46.74) catches detergent and lint rollers in the dead space above.
Zone 2: Sorter (at the entry point)
The 3-bag rolling sorter sits at the doorway threshold — never in the corner. The Simple Houseware 3-bag sorter ($38.87) is the workhorse for a 4-person household; the STORAGE MANIAC 4-section ($35.99) adds a separate delicates bin.
Zone 3: Drying Rack (along an empty wall)
A free-standing drying rack along the longest empty wall catches delicates. The Honey-Can-Do collapsible drying rack ($23.97) folds flat when not in use; place it opposite the door.
Zone 4: Detergent Storage (closed cabinet above the machines)
Detergent, stain remover, dryer sheets, and lint rollers live in a closed cabinet to keep humidity off cardboard. The ClosetMaid SuperSlide shelf kit ($46.74) provides open shelving; pair with a wall-mounted cabinet door.
Zone 5: Folding Surface (within three steps of the dryer)
A wall-mounted fold-out table or countertop extension gives a place to fold right out of the dryer. See laundry folding station — this is the zone most often skipped.
Zone 6: Ironing Station (rare, layout-dependent)
A wall-mounted ironing board or pull-out drawer fits inside Zone 1 or Zone 3. Skip if the household uses a steamer only. See laundry iron repair for ironing-board options.
Zone 7: Cleaning Supply Closet (adjacent or shared)
A small adjacent closet holds mop, broom, vacuum, and laundry-specific cleaning products. Sorter pair coverage sits in laundry sorting systems.
The Quick Layout Framework (5 Steps)
A floor plan is faster to build when the steps are fixed. Measure first, validate doors and vents, then place equipment.
Step 1: Measure Your Machine Footprint and Doorway Width
Measure three dimensions. Width: front-loaders are 27 inches each; side-by-side is 54 inches plus 1-2 inches clearance each side (56-58 inches total). Depth: 30-32 inches each plus 4 inches rear. Height: stacked pair needs 78 inches ceiling. Doorway: at least 32 inches wide for delivery.
Step 2: Validate Door Swing and Entry Clearance
A door that swings into the room blocks Zone 2 when open. Replace it with a bi-fold door (Kimberly Bay, $126.88) that swings flat, or change to a pocket door.
Step 3: Map the Vent Path and Keep Total Duct Run Under 25 Feet
A long flexible duct run (>25 feet total) restricts airflow and is the leading cause of dryer fires. Route through the nearest exterior wall, not along the ceiling. Add a ClosetMaid SuperSlide shelf ($46.74) for supply storage nearby.
Step 4: Place the Sorter at the Entry Point
The sorter sits at the doorway threshold, not in a corner or across the room from the washer. The Simple Houseware 3-bag cart ($38.87) handles 4-person households; the STORAGE MANIAC 4-section sorter ($35.99) is the upgrade for four categories.
Step 5: Pick the Layout Archetype That Matches the Room
Use the smallest dimension (door width, hallway width, wall length) to pick the archetype. Stacked fits narrow-vertical; side-by-side fits wide-horizontal; closet fits a converted reach-in; hallway nook fits recessed. See 5-stage laundry room organization.
Layout by Room Size

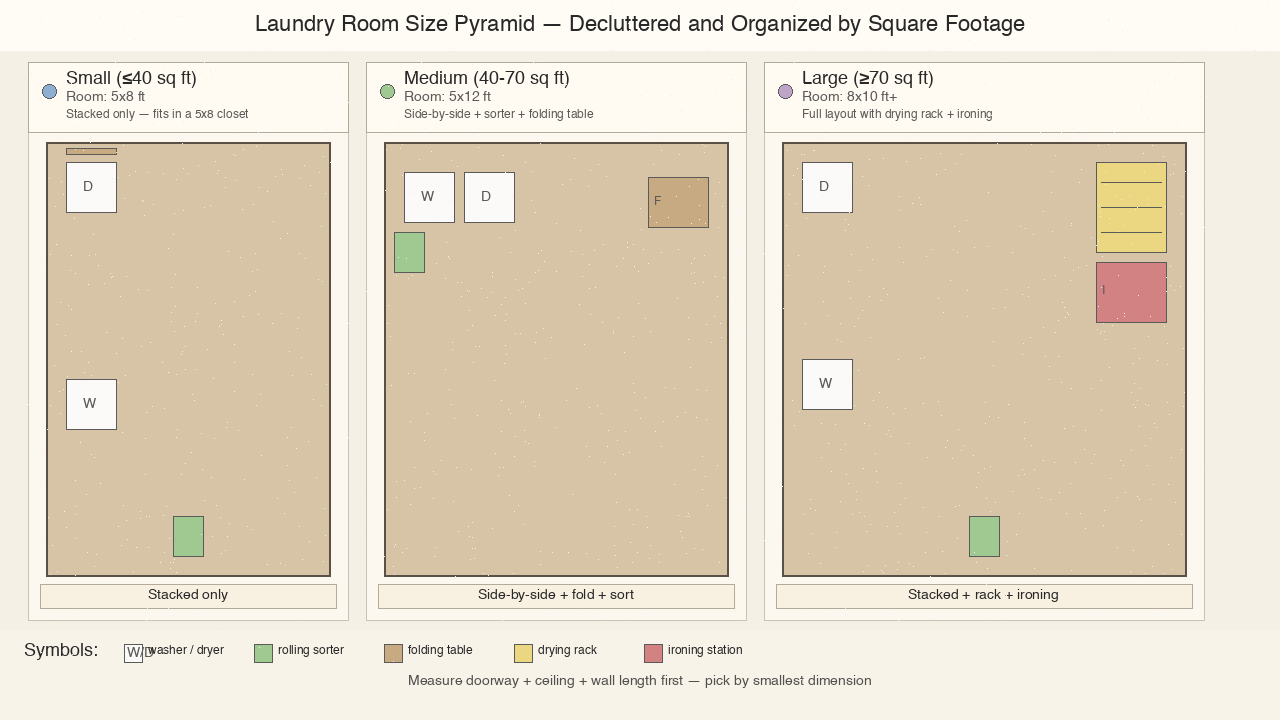
Room size is the easiest variable to measure. Three tiers cover every laundry.
Small (≤40 sq ft)
Most small laundry rooms are 5x8 closets or 4x10 hallway nooks. Stacked layout is the only option. The Funmit KSTK1 stacking kit ($28.97) plus Dadop pads ($9.98) plus a 3-tier over-the-machine shelf gives a full layout in 12 sq ft of floor footprint.
Medium (40-70 sq ft)
Side-by-side layout fits, with room for a 30-inch folding table. The ClosetMaid Cubeicals 6-cube ($65.99) plus the Simple Houseware 3-bag sorter ($38.87) covers every zone without crowding.
Large (≥70 sq ft)
Either archetype works, plus a freestanding drying rack, full-size ironing station, and clean-supply closet. For sub-40 sq ft rooms, see small laundry room organization.
What You’ll Need
For 4-person households, plan a full layout budget of $350-450. For 1-2 person households, drop the ClosetMaid Cubeicals ($65.99) and bi-fold door (Kimberly Bay, $126.88) and stay in the $170-220 range.
- Funmit KSTK1 27-inch Stacking Kit ($28.97) — best layout anchor; reclaims 16 sq ft of floor
- Kimberly Bay Bi-fold Door ($126.88) — best door enclosure for closet conversion
- Simple Houseware 3-Bag Sorter ($38.87) — doorway sorter pair
- STORAGE MANIAC 4-Section Sorter ($35.99) — 4-bin sorter for separate delicates
- ClosetMaid SuperSlide Shelf Kit ($46.74) — best above-machine or side-wall storage
- ClosetMaid Cubeicals 6-Cube ($65.99) — storage-pedestal alternative + folding surface
- Honey-Can-Do Collapsible Drying Rack ($23.97) — air-dry zone
- Dadop 4-Pack Anti-Vibration Pads ($9.98) — required for stacked layouts
Constraint Guide
If You Rent and Cannot Modify the Walls
Skip the Kimberly Bay bi-fold door ($126.88) and the ClosetMaid Cubeicals ($65.99) — both require permanent install. Use the Simple Houseware sorter ($38.87) plus the Honey-Can-Do rack ($23.97).
If the Doorway Is Under 32 Inches Wide
A narrow doorway forces a compact 24-inch washer, which most households find too small. Skip stacked (delivery fails) and use side-by-side with the ClosetMaid Cubeicals ($65.99) as a folding surface, plus the ClosetMaid SuperSlide shelf ($46.74) above.
If the Vent Path Exceeds 25 Feet
Route through the nearest exterior wall rather than along the ceiling — long horizontal runs collect lint at every elbow. Add the Dadop pads ($9.98) on a stacked pair, and the ClosetMaid SuperSlide shelf ($46.74) for supplies.
If the Floor Space Is Under 12 sq ft
Skip the STORAGE MANIAC 4-section sorter ($35.99) and the Honey-Can-Do drying rack ($23.97). Buy only the Funmit KSTK1 stacking kit ($28.97) plus the Dadop pads ($9.98) and use a wall-mounted sorter.
If the Layout Has No Closed Cabinet for Detergent
Pair the ClosetMaid SuperSlide shelf kit ($46.74) with a wall-mounted cabinet door — cardboard detergent on open shelves absorbs moisture and clumps within weeks. Add the ClosetMaid Cubeicals ($65.99) for closed storage.
If the Household Uses a Steamer Instead of an Iron
Skip Zone 6 (Ironing Station) and reclaim wall space for the Honey-Can-Do drying rack ($23.97) plus a ClosetMaid Cubeicals ($65.99) for steamer storage.
Common Mistakes
- Vent Run Longer Than 25 Feet. A flexible duct run (>25 feet total) restricts airflow and lengthens dry times. Route through the nearest exterior wall, not along the ceiling. See Zone Cleaning Method for the zone-boundary principle.
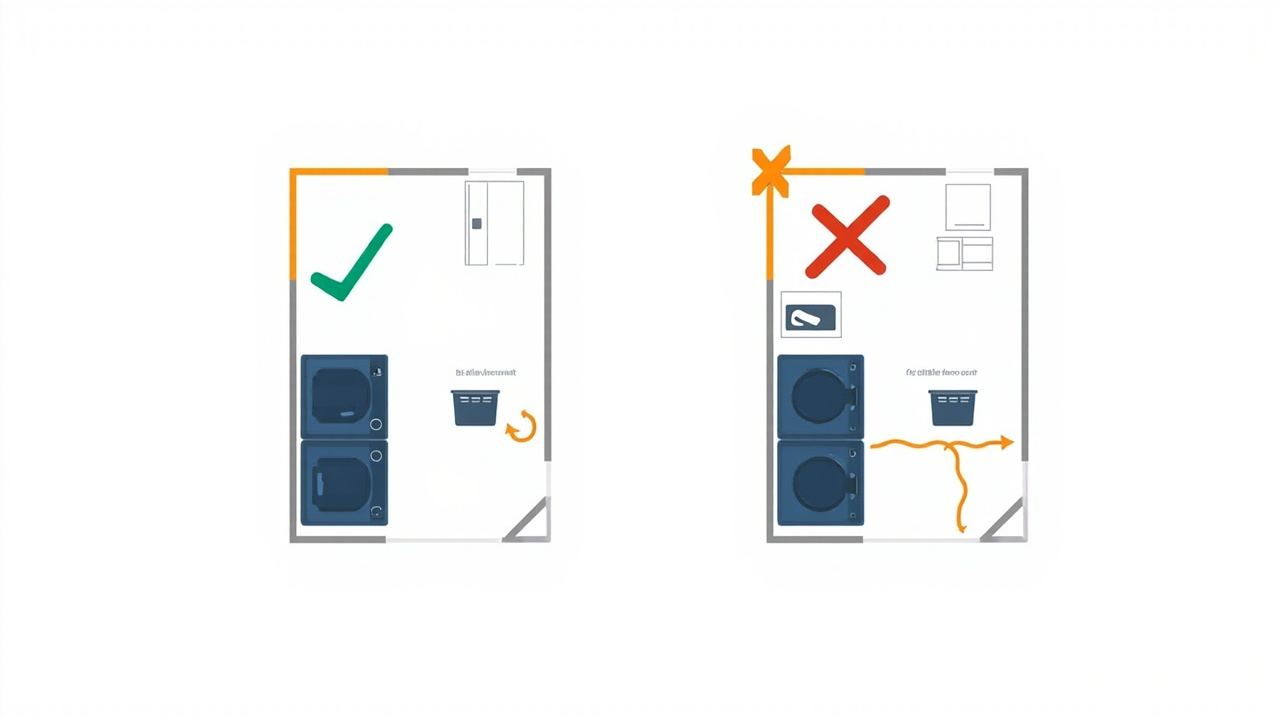
- Sorter Placed Across the Room from the Washer. A sorter more than 4 feet from the washer gets ignored — dirty clothes end up on the floor. Place the sorter at the entry point. The Simple Houseware 3-bag cart ($38.87) or STORAGE MANIAC 4-section sorter ($35.99) handles 4-person households.
Mistakes Recap
-
No Closed Storage for Detergent. Cardboard detergent boxes on an open shelf absorb moisture and clump. Detergent belongs in a closed cabinet above the machines, not on the open shelf where the ClosetMaid SuperSlide ($46.74) stores baskets. A 12-month detergent box can clump in 6 weeks.
-
Folding Surface Outside the Laundry Room. A folding surface across the house interrupts the dryer-to-fold path; clothes sit in the dryer for hours. Add a ClosetMaid Cubeicals ($65.99) or wall-mounted folding table inside the laundry.
-
Ignoring Door Swing. A door that swings into the room blocks Zone 2 when open. Replace it with a bi-fold door (Kimberly Bay, $126.88).
When to Call a Pro
- Vent path requires cutting through brick or masonry — hire a mason.
- Layout requires moving the 240V dryer outlet — licensed electrician required by code.
- Doorway needs widening for stacked-pair delivery — carpenter, not DIY.
- Floor is uneven (>1 inch slope across the room) — leveling before pedestal install is worth the contractor fee.
Safety Notes
- Never vent a dryer into a chimney, attic, or crawlspace — code violation and fire risk.
- Never use plastic flexible duct for dryer venting — aluminum only.
- Never install a stacking kit on a top-load washer — front-loaders only.
- Always anchor a wall-mounted shelf to studs — drywall anchors won’t hold a loaded 3-tier shelf.
- Keep the Dadop anti-vibration pads ($9.98) under the front feet of the stacked pair.
Maintenance Rhythm
- Weekly (5 minutes): wipe the folding surface, return finished loads, vacuum under the sorter.
- Monthly (15 minutes): lint-trap vacuum, dryer-vent exterior hood check, restock stain supplies.
- Quarterly (30 minutes): pull the dryer out and vacuum the back panel; check bi-fold door hinges; verify stacking kit brackets.
Related Guides
- Laundry Room Organization — 5-stage workflow
- Laundry Folding Station — fold-out workspace
- Laundry Sorting Systems — sorter pair deep-dive
- Laundry Supplies Organization — Zone 4 storage
- Small Laundry Room Organization — small-space overrides
- Laundry Iron Repair — ironing-board options
Key Takeaways
- Measure the doorway first — it decides stacked vs side-by-side.
- Sorter goes at the entry point, not in the corner.
- Detergent belongs in a closed cabinet above the machines.
- Folding surface must be within three steps of the dryer.
- Vent run total must stay under 25 feet of flexible duct.
- Bi-fold doors save floor space in hallway nook and alcove conversions.